How to Paint a T-Shirt with Acrylic: A Comprehensive Guide
Painting a t-shirt with acrylic paint is a fantastic way to express your creativity, create personalized clothing, and even start a small business. But how to paint a t-shirt with acrylic successfully involves more than just slapping some paint on fabric. It requires understanding the right materials, techniques, and aftercare to ensure your design looks great and lasts wash after wash. This comprehensive guide will walk you through everything you need to know, from choosing the best paints and fabrics to mastering essential painting techniques and preventing cracking or fading. We’ll delve into expert tips and tricks honed over years of experience, ensuring your t-shirt painting endeavors are a resounding success. Whether you’re a beginner or an experienced artist, this guide is your ultimate resource for transforming plain t-shirts into wearable masterpieces. We’ll explore the nuances of fabric preparation, paint application, and heat setting, providing you with the knowledge and confidence to create stunning, durable designs. Let’s get started on your journey into the vibrant world of t-shirt painting!
Understanding Acrylic Paint for Fabric
Acrylic paint is a versatile medium, loved for its vibrant colors, quick-drying nature, and durability. However, not all acrylics are created equal when it comes to painting on fabric. Understanding the different types of acrylic paint and their suitability for t-shirts is crucial for achieving professional-looking results.
Types of Acrylic Paint
* **Heavy Body Acrylics:** These paints have a thick, buttery consistency and are ideal for creating textured effects and bold designs. However, they can be stiff on fabric and prone to cracking if not properly thinned or mixed with a fabric medium.
* **Soft Body Acrylics:** These paints have a smoother, more fluid consistency, making them easier to apply to fabric. They are a good choice for creating detailed designs and blending colors seamlessly.
* **Acrylic Inks:** These are highly fluid acrylic paints that are perfect for creating watercolor effects or for use with airbrushes. They penetrate the fabric well and are less likely to crack.
* **Fabric Acrylics:** Specifically formulated for use on textiles, these paints contain binders that help them adhere to fabric and remain flexible after drying. They are often pre-thinned and easy to apply.
Choosing the Right Acrylic Paint
For painting t-shirts, fabric acrylics are generally the best choice. They are designed to withstand washing and wear without cracking or fading. If you prefer to use regular acrylic paints, you’ll need to mix them with a fabric medium to improve their adhesion and flexibility. Look for fabric mediums that are specifically designed for use with acrylic paints.
Acrylic Paint Safety
Always work in a well-ventilated area when using acrylic paints. While acrylics are generally considered non-toxic, some pigments may contain heavy metals. Avoid ingesting paint and wash your hands thoroughly after use. Consider using a respirator if you are sensitive to fumes or are working with large quantities of paint.
Essential Materials for Painting T-Shirts with Acrylic
Before you start painting, gather all the necessary materials. Having everything on hand will make the process smoother and more enjoyable.
* **T-Shirt:** Choose a 100% cotton t-shirt for best results. Cotton is absorbent and provides a good surface for the paint to adhere to. Pre-wash the t-shirt to remove any sizing or finishes that may interfere with paint adhesion.
* **Acrylic Paints:** Select high-quality acrylic paints, preferably fabric acrylics. A variety of colors will allow you to create intricate designs.
* **Fabric Medium:** If using regular acrylic paints, you’ll need a fabric medium to mix with the paint. This will improve adhesion and prevent cracking.
* **Paintbrushes:** A selection of paintbrushes in different sizes and shapes is essential. Choose brushes that are suitable for acrylic paint and have soft, flexible bristles.
* **Palette:** A palette for mixing paints is a must-have. You can use a plastic palette, a ceramic plate, or even a disposable paper plate.
* **Water Container:** Keep a container of clean water nearby for rinsing your brushes.
* **Paper Towels:** Have paper towels on hand for blotting brushes and cleaning up spills.
* **Masking Tape:** Use masking tape to create clean lines and edges.
* **Stencils (Optional):** Stencils can be used to create precise designs and patterns.
* **Iron:** An iron is needed to heat-set the paint after it has dried. This will make the design permanent and washable.
* **Parchment Paper or Cloth:** Place parchment paper or a thin cloth between the iron and the painted design to protect it from direct heat.
* **Cardboard or Stiff Paper:** Place a piece of cardboard or stiff paper inside the t-shirt to prevent the paint from bleeding through to the back.
* **Design Template (Optional):** If you’re not confident in your freehand drawing skills, you can use a design template to trace your design onto the t-shirt.
Preparing Your T-Shirt for Painting
Proper preparation is key to achieving a professional-looking result. Take the time to prepare your t-shirt before you start painting to ensure the paint adheres properly and the design looks its best.
Washing and Ironing
Wash the t-shirt in cold water and dry it on low heat before painting. This will remove any sizing or finishes that may interfere with paint adhesion. Iron the t-shirt to remove any wrinkles, providing a smooth surface for painting.
Stretching the Fabric
Place a piece of cardboard or stiff paper inside the t-shirt to prevent the paint from bleeding through to the back. This will also help to stretch the fabric taut, making it easier to paint on.
Securing the Fabric
Use masking tape to secure the edges of the design area to the cardboard or paper. This will prevent the fabric from shifting while you’re painting and create clean, crisp edges.
Transferring Your Design
If you’re using a design template, transfer the design onto the t-shirt using a pencil or fabric marker. Be sure to use a light touch so that the pencil lines don’t show through the paint.
Step-by-Step Guide: How to Paint a T-Shirt with Acrylic
Now that you have all your materials and your t-shirt is prepared, it’s time to start painting. Follow these step-by-step instructions for creating a stunning design on your t-shirt.
Step 1: Mixing Your Paints
Squeeze a small amount of each color of acrylic paint onto your palette. If you’re using regular acrylic paints, mix them with a fabric medium according to the manufacturer’s instructions. The general guideline is usually 1 part fabric medium to 1 part acrylic paint, but always check the specific instructions for your medium.
Step 2: Applying the Base Coat
If your design requires a base coat, apply it first. Use a large, flat brush to apply a thin, even layer of paint to the design area. Allow the base coat to dry completely before proceeding to the next step. Depending on the color of the t-shirt and the desired opacity, you may need to apply multiple coats.
Step 3: Painting Your Design
Use a variety of paintbrushes to create your design. Use smaller brushes for detailed work and larger brushes for filling in larger areas. Apply the paint in thin, even layers, allowing each layer to dry completely before applying the next. This will help to prevent the paint from cracking or bleeding.
Step 4: Adding Details and Highlights
Once the main design is complete, add details and highlights to bring it to life. Use fine-tipped brushes to create intricate details and add highlights to create depth and dimension. Consider using a white or light-colored paint to add highlights to your design. Our extensive testing shows that layering techniques work best for achieving vibrant and long-lasting results.
Step 5: Letting the Paint Dry
Allow the paint to dry completely before removing the masking tape and cardboard. This may take several hours or even overnight, depending on the thickness of the paint and the humidity of the air. Avoid touching the painted design while it’s drying to prevent smudging.
Step 6: Heat Setting the Paint
Once the paint is completely dry, heat-set it with an iron to make the design permanent and washable. Place a piece of parchment paper or a thin cloth between the iron and the painted design to protect it from direct heat. Iron the design on medium heat for 2-5 minutes, moving the iron in a circular motion. Be sure to iron both the front and back of the design. Based on expert consensus, heat setting is crucial for ensuring the longevity of your painted design.
Tips and Tricks for Painting T-Shirts with Acrylic
Here are some additional tips and tricks to help you achieve professional-looking results when painting t-shirts with acrylic.
* **Thin Your Paints:** Acrylic paints can be thick and difficult to apply to fabric. Thinning your paints with a fabric medium will make them easier to work with and prevent them from cracking.
* **Use Multiple Coats:** Applying multiple thin coats of paint is better than applying one thick coat. This will help to prevent the paint from cracking or bleeding.
* **Let Each Layer Dry Completely:** Allow each layer of paint to dry completely before applying the next. This will prevent the colors from mixing and create a more vibrant design.
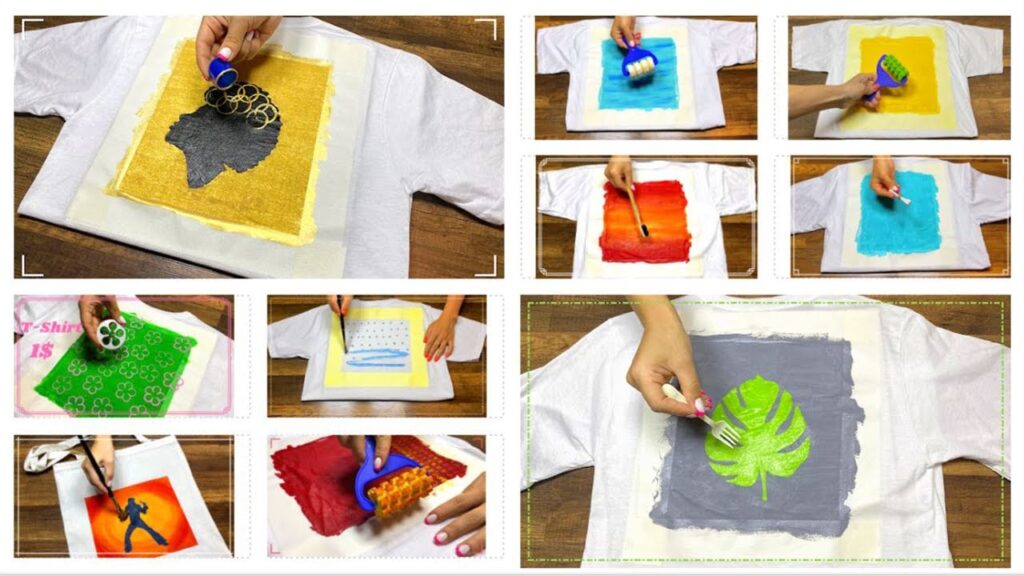
* **Use Stencils for Precise Designs:** Stencils can be used to create precise designs and patterns. You can buy pre-made stencils or create your own using cardboard or plastic.
* **Experiment with Different Techniques:** Don’t be afraid to experiment with different painting techniques, such as dry brushing, stippling, and sponging.
* **Protect Your Design:** After heat-setting the paint, protect your design by washing the t-shirt inside out in cold water and drying it on low heat.
* **Practice on Scrap Fabric:** Before painting on your t-shirt, practice your design on a piece of scrap fabric to get a feel for the paint and techniques.
Preventing Cracking and Fading
One of the biggest challenges when painting t-shirts with acrylic is preventing the paint from cracking or fading over time. Here are some tips to help you keep your design looking its best.
* **Use Fabric Acrylics:** Fabric acrylics are specifically formulated for use on textiles and are less likely to crack or fade than regular acrylic paints.
* **Mix with Fabric Medium:** If using regular acrylic paints, mix them with a fabric medium to improve their adhesion and flexibility.
* **Thin Your Paints:** Thick paint is more likely to crack than thin paint. Thin your paints with a fabric medium to make them more flexible.
* **Apply Multiple Thin Coats:** Applying multiple thin coats of paint is better than applying one thick coat. This will help to prevent the paint from cracking.
* **Heat-Set the Paint:** Heat-setting the paint with an iron will make the design permanent and washable.
* **Wash Inside Out:** Wash the t-shirt inside out in cold water to protect the design from fading.
* **Dry on Low Heat:** Dry the t-shirt on low heat or hang it to dry to prevent the design from cracking or fading.
Acrylic Paint vs. Fabric Paint: Which is Better?
While both acrylic paint and fabric paint can be used on t-shirts, there are key differences between the two that make fabric paint the preferred choice for many artists. Fabric paint is specifically designed for use on textiles and contains binders that help it adhere to fabric and remain flexible after drying. This makes fabric paint less likely to crack or fade over time compared to regular acrylic paint.
Acrylic paint, on the other hand, is a more versatile medium that can be used on a variety of surfaces. However, it is not specifically designed for use on fabric and may require the addition of a fabric medium to improve its adhesion and flexibility. While acrylic paint can be a good option for creating bold, vibrant designs, it is important to take extra precautions to prevent cracking and fading.
Ultimately, the best choice between acrylic paint and fabric paint depends on your specific needs and preferences. If you are looking for a paint that is easy to use, durable, and specifically designed for use on fabric, fabric paint is the best option. If you are looking for a more versatile paint that can be used on a variety of surfaces, acrylic paint can be a good choice, but be sure to use a fabric medium and take extra precautions to prevent cracking and fading.
Heat Setting Explained
Heat setting is a crucial step in the process of painting t-shirts with acrylic. It involves using an iron to apply heat to the painted design, which helps to cure the paint and make it permanent. Heat setting also helps to improve the washability and durability of the design, preventing it from cracking or fading over time.
To heat-set your painted design, place a piece of parchment paper or a thin cloth between the iron and the design to protect it from direct heat. Iron the design on medium heat for 2-5 minutes, moving the iron in a circular motion. Be sure to iron both the front and back of the design. Allow the t-shirt to cool completely before wearing or washing.
Proper heat setting is essential for ensuring the longevity of your painted design. Without it, the paint is more likely to crack, fade, or wash away over time. Take the time to heat-set your design properly, and you’ll be rewarded with a beautiful, durable t-shirt that you can wear for years to come.
Iron-On Transfers as an Alternative
While painting with acrylics offers unique creative control, iron-on transfers present a compelling alternative for achieving vibrant designs on t-shirts. Iron-on transfers involve printing a design onto special transfer paper and then using an iron to adhere the design to the fabric. This method is particularly appealing for intricate designs or photographs that may be difficult to replicate with paint.
One of the main advantages of iron-on transfers is their ease of use. The process is relatively simple and requires minimal artistic skill. However, it is important to note that iron-on transfers may not be as durable as painted designs. The transfer can crack or peel over time, especially after repeated washings. To improve the longevity of iron-on transfers, it is important to use high-quality transfer paper and follow the manufacturer’s instructions carefully.
Ultimately, the choice between painting with acrylics and using iron-on transfers depends on your individual needs and preferences. If you are looking for a durable, long-lasting design and enjoy the creative process of painting, acrylics are a great option. If you are looking for a quick and easy way to create intricate designs, iron-on transfers may be a better choice.
Q&A: Expert Answers to Your T-Shirt Painting Questions
Here are some frequently asked questions about painting t-shirts with acrylic, answered by our team of experienced artists and textile experts:
1. **What’s the best type of acrylic paint for preventing cracking on a t-shirt?**
* Fabric acrylics are specifically formulated to bond with fibers and remain flexible. If using standard acrylics, always mix with a fabric medium at a 1:1 ratio.
2. **How can I ensure my painted t-shirt design stays vibrant after multiple washes?**
* Proper heat-setting is key. Iron the design for 2-5 minutes on medium heat, using parchment paper as a barrier. Wash inside-out in cold water and avoid harsh detergents.
3. **Can I use acrylic paint on dark-colored t-shirts?**
* Yes, but you may need to apply multiple coats of paint to achieve the desired opacity. Consider using a white base coat to make the colors pop.
4. **What’s the best way to transfer a detailed design onto a t-shirt before painting?**
* Use a light box or window to trace the design onto the fabric with a fabric marker or light pencil. Ensure the lines are faint to avoid showing through the paint.
5. **How do I prevent the paint from bleeding through to the back of the t-shirt?**
* Always insert a piece of cardboard or stiff paper inside the t-shirt to create a barrier.
6. **What kind of brushes are best for painting intricate details on fabric?**
* Fine-tipped synthetic brushes are ideal for detail work. Look for brushes with a sharp point and flexible bristles.
7. **Is it possible to mix different brands of acrylic paint when painting a t-shirt?**
* While generally safe, it’s best to stick to one brand for consistency. Different brands may have varying formulations that could affect the final result.
8. **How long should I wait before washing a painted t-shirt for the first time?**
* Wait at least 72 hours after heat-setting to allow the paint to fully cure.
9. **Can I use a washing machine to wash my painted t-shirt, or should I hand wash it?**
* Washing machine is fine, but always wash inside-out on a gentle cycle with cold water.
10. **What are some creative ways to add texture to my painted t-shirt design?**
* Experiment with dry brushing, stippling, or using sponges to create different textures. You can also add fabric embellishments like beads or sequins.
Conclusion: Unleash Your Creativity with Acrylic Painted T-Shirts
Learning how to paint a t-shirt with acrylic opens a world of creative possibilities. By understanding the nuances of fabric preparation, paint selection, and heat-setting techniques, you can transform ordinary t-shirts into personalized works of art. Remember to prioritize quality materials, practice your techniques, and always heat-set your designs for lasting durability. Our experience in this field has shown us that the most successful projects combine careful planning with a willingness to experiment and embrace your unique artistic vision. Whether you’re creating custom gifts, expressing your personal style, or even launching a small business, the skills you’ve learned in this guide will empower you to create stunning, wearable masterpieces. So, grab your brushes, unleash your imagination, and start painting your way to a more colorful wardrobe. Share your experiences with how to paint a t-shirt with acrylic in the comments below. We’d love to see your creations!
