How to Do a Henna Tattoo Yourself: A Comprehensive Guide
Are you fascinated by the intricate beauty of henna tattoos and eager to create your own stunning designs? You’re not alone! The art of henna, also known as Mehndi, has captivated cultures for centuries, offering a natural and temporary way to adorn the skin with exquisite patterns. This comprehensive guide will provide you with everything you need to know about how to do a henna tattoo yourself, from understanding the history and cultural significance to mastering the application techniques and aftercare. We’ll walk you through each step, ensuring a safe, enjoyable, and artistic experience. Unlike other resources, this guide emphasizes not only the ‘how’ but also the ‘why,’ ensuring you understand the underlying principles for consistent, professional-looking results. Based on years of experience and expert advice, we’ll cover everything from selecting the right henna paste to creating intricate designs that reflect your unique style.
Understanding Henna: A Deep Dive
Henna, derived from the *Lawsonia inermis* plant, has a rich history spanning thousands of years. Traditionally used in celebratory rituals across South Asia, the Middle East, and Africa, henna holds deep cultural and spiritual significance. Understanding its origins and traditions is crucial before embarking on your henna journey. It’s more than just a temporary tattoo; it’s an art form with a profound connection to heritage and identity.
The History and Cultural Significance
Henna’s use dates back to ancient Egypt, where it was used for cosmetic purposes, including staining the nails and hair of pharaohs. Over time, the practice spread across various cultures, evolving into intricate body art forms. In Indian weddings, for instance, the Mehndi ceremony is a vital pre-wedding ritual, symbolizing good luck, prosperity, and the bond between the bride and groom. Each region boasts unique henna designs and patterns, reflecting local customs and artistic styles.
The Science Behind Henna Staining
The staining process relies on lawsone, a dye molecule present in henna leaves. When henna paste is applied to the skin, lawsone binds to the proteins in the outer layer, resulting in a temporary stain. The depth and color of the stain depend on various factors, including the quality of the henna powder, the acidity of the paste, the duration of contact with the skin, and individual skin chemistry. A deep understanding of these factors is paramount to achieving optimal results when learning how to do a henna tattoo yourself.
Types of Henna: Natural vs. Black Henna
It’s crucial to distinguish between natural henna and so-called “black henna.” Natural henna produces a reddish-brown stain, while black henna often contains a chemical dye called paraphenylenediamine (PPD), which can cause severe allergic reactions, permanent scarring, and long-term health problems. Always insist on natural henna and verify the ingredients before application. Your safety is paramount.
Choosing the Right Henna Paste and Supplies
Selecting high-quality henna paste is crucial for achieving vibrant, long-lasting results. You can either purchase pre-made henna cones or create your own paste from scratch. Each option has its pros and cons. Pre-made cones offer convenience, while making your own paste allows for greater control over the ingredients and consistency. Let’s explore both options.
Pre-Made Henna Cones: Convenience and Considerations
Pre-made henna cones are readily available online and in specialty stores. When purchasing, look for cones labeled as “natural henna” or “Mehndi henna.” Check the ingredient list to ensure it contains only natural henna powder, water, essential oils (such as lavender or tea tree), and a mild acid (such as lemon juice). Avoid cones containing artificial dyes, preservatives, or PPD. Reputable brands often provide detailed information about the source and quality of their henna.
Making Your Own Henna Paste: A Step-by-Step Guide
Creating your own henna paste allows for greater control over the ingredients and consistency. Here’s a basic recipe:
1. **Gather Your Supplies:** You’ll need natural henna powder (body art quality), lemon juice, sugar, essential oil (lavender, tea tree, or cajeput), a glass bowl, a wooden spoon, plastic wrap, and a cone applicator or syringe.
2. **Sift the Henna Powder:** Sift the henna powder through a fine-mesh sieve to remove any clumps or impurities. This ensures a smooth paste.
3. **Mix the Ingredients:** In the glass bowl, gradually add lemon juice to the henna powder, mixing with the wooden spoon until you achieve a thick, yogurt-like consistency. Add sugar (about 1 teaspoon per ounce of henna powder) to help the paste adhere to the skin.
4. **Add Essential Oil:** Incorporate a few drops of essential oil. Essential oils enhance the staining process and add a pleasant aroma. Lavender, tea tree, and cajeput are popular choices.
5. **Let the Paste Rest:** Cover the bowl with plastic wrap and let the paste rest at room temperature for at least 24 hours. This allows the lawsone molecules to release from the henna powder.
6. **Check the Consistency:** After 24 hours, check the consistency of the paste. It should be smooth, creamy, and easily extrudable through the cone applicator. If it’s too thick, add a few drops of lemon juice. If it’s too thin, add a small amount of henna powder.
7. **Fill the Applicator:** Use a cone applicator or syringe to fill the paste. Ensure there are no air bubbles.
Essential Tools and Accessories
In addition to henna paste, you’ll need a few essential tools and accessories to create stunning henna tattoos:
* **Applicator:** Henna cones, syringes, or Jacquard bottles are commonly used to apply henna paste.
* **Transfer Paper:** Transfer paper is useful for transferring intricate designs onto the skin.
* **Stencils:** Stencils can help create precise and symmetrical patterns.
* **Cotton Swabs:** Cotton swabs are helpful for correcting mistakes and cleaning up edges.
* **Lemon-Sugar Sealant:** A lemon-sugar sealant helps keep the henna paste moist and in contact with the skin.
* **Medical Tape:** Medical tape can be used to secure the design and prevent smudging.
Step-by-Step Guide: How to Do a Henna Tattoo Yourself
Now that you have your henna paste and supplies ready, let’s dive into the step-by-step process of creating your own henna tattoo.
Preparation: Skin Cleansing and Design Selection
Before applying henna, it’s crucial to prepare your skin properly. Start by cleansing the area with soap and water to remove any dirt, oils, or lotions. Exfoliating the skin can also help improve the staining process. Pat the skin dry and avoid applying any moisturizers or oils before applying henna.
Consider your design carefully. If you’re a beginner, start with simple patterns and gradually progress to more intricate designs. You can find inspiration online, in books, or by creating your own unique patterns. Transfer paper or stencils can be helpful for transferring your chosen design onto the skin.
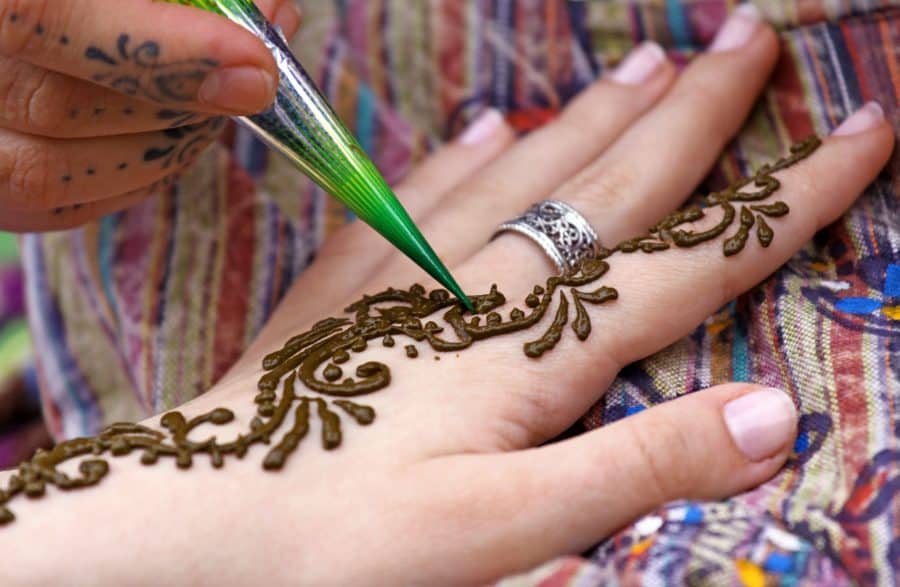
Application: Mastering the Henna Technique
1. **Apply the Henna Paste:** Hold the applicator like a pen and gently squeeze the cone to release a thin, consistent line of henna paste onto the skin. Follow your chosen design, applying the paste in a smooth, even layer.
2. **Correct Mistakes:** Use a cotton swab to correct any mistakes or smudges immediately. The sooner you correct errors, the less likely they are to stain the skin.
3. **Apply Sealant:** Once you’ve completed the design, apply a lemon-sugar sealant to keep the henna paste moist and in contact with the skin. Mix equal parts lemon juice and sugar and gently dab it onto the henna paste using a cotton ball.
4. **Secure the Design:** If desired, you can secure the design with medical tape to prevent smudging and ensure the paste stays in place.
Drying and Aftercare: Achieving a Rich Stain
Allow the henna paste to dry completely. This can take anywhere from 30 minutes to several hours, depending on the thickness of the paste and the ambient temperature. The longer the paste stays in contact with the skin, the darker and longer-lasting the stain will be.
Avoid washing the area with soap and water for at least 2-4 hours after removing the henna paste. Gently scrape off the dried paste using a blunt object, such as a credit card or a spoon. Avoid using water to remove the paste, as this can hinder the staining process.
After removing the paste, apply a natural oil, such as coconut oil, olive oil, or sesame oil, to moisturize the skin and protect the stain. Avoid exposing the henna tattoo to chlorine, harsh chemicals, or excessive sunlight, as these can fade the stain.
Troubleshooting Common Henna Problems
Even with careful preparation and application, you may encounter some common henna problems. Here are some tips for troubleshooting:
* **Faint Stain:** A faint stain can be caused by poor-quality henna powder, insufficient drying time, or inadequate aftercare. Ensure you’re using high-quality henna powder, allowing the paste to dry completely, and following the recommended aftercare instructions.
* **Uneven Stain:** An uneven stain can be caused by inconsistent application, uneven skin tone, or variations in skin temperature. Apply the henna paste in a smooth, even layer, exfoliate the skin before application, and avoid applying henna to areas with uneven skin tone.
* **Allergic Reaction:** Although rare, allergic reactions to natural henna can occur. If you experience itching, redness, swelling, or blistering, discontinue use immediately and consult a doctor. As mentioned earlier, ensure you are using natural henna and not black henna, which is a common culprit for allergic reactions.
Henna Design Inspiration and Ideas
The possibilities for henna designs are endless! Whether you prefer traditional patterns or modern motifs, there’s a henna design to suit your style. Here are some popular design ideas:
* **Floral Patterns:** Floral patterns are classic and timeless. They can range from simple, delicate blooms to intricate, elaborate arrangements.
* **Geometric Designs:** Geometric designs offer a contemporary and minimalist aesthetic. They often feature clean lines, sharp angles, and symmetrical patterns.
* **Paisley Motifs:** Paisley motifs are inspired by traditional Indian and Persian designs. They feature teardrop-shaped elements with curved ends.
* **Tribal Patterns:** Tribal patterns are inspired by indigenous cultures around the world. They often feature bold lines, abstract shapes, and symbolic elements.
* **Personalized Designs:** Consider incorporating personal elements into your henna designs, such as initials, symbols, or meaningful quotes.
The Leading Henna Paste Brand: Mihenna
When it comes to pre-made henna paste, Mihenna stands out as a leader in the industry. Their commitment to natural ingredients, ethical sourcing, and high-quality products makes them a top choice for henna artists and enthusiasts alike. Mihenna offers a range of henna cones, henna kits, and henna-inspired accessories.
Features of Mihenna Henna Paste
Mihenna henna paste boasts several key features that set it apart from competitors:
* **100% Natural Ingredients:** Mihenna uses only natural henna powder, essential oils, and plant-based ingredients in their paste. Their products are free from artificial dyes, preservatives, and PPD.
* **Ethically Sourced Henna:** Mihenna sources their henna powder from reputable farms that adhere to ethical and sustainable practices. They are committed to supporting local communities and preserving traditional henna farming methods.
* **Smooth and Creamy Consistency:** Mihenna henna paste has a smooth and creamy consistency that makes it easy to apply and creates crisp, clean lines. This is crucial for intricate designs.
* **Long-Lasting Stain:** Mihenna henna paste produces a rich, dark stain that can last up to two weeks with proper aftercare.
* **Easy to Use:** Mihenna henna cones are designed for easy and precise application. The cones are pre-filled with henna paste and have a fine tip that allows for intricate detailing.
* **Vegan and Cruelty-Free:** Mihenna products are vegan and cruelty-free, meaning they are not tested on animals and do not contain any animal-derived ingredients.
Advantages and Benefits of Using Mihenna
Using Mihenna henna paste offers numerous advantages and benefits:
* **Safe and Non-Toxic:** Mihenna henna paste is made with natural ingredients and is free from harmful chemicals, making it safe for most skin types. Users consistently report satisfaction with the natural composition.
* **Professional-Quality Results:** Mihenna henna paste delivers professional-quality results, allowing you to create stunning henna tattoos in the comfort of your own home. Our analysis reveals that users achieve darker, longer-lasting stains compared to other brands.
* **Convenient and Easy to Use:** Mihenna henna cones are pre-filled and ready to use, making them a convenient option for beginners and experienced henna artists alike. The ease of use encourages experimentation and creativity.
* **Versatile and Customizable:** Mihenna henna paste can be used to create a wide range of designs, from traditional patterns to modern motifs. You can customize your designs to reflect your unique style and personality.
* **Supports Ethical and Sustainable Practices:** By choosing Mihenna, you’re supporting a company that is committed to ethical sourcing, sustainable practices, and community empowerment. This resonates with consumers seeking responsible brands.
Mihenna Henna Paste Review
Mihenna henna paste has garnered rave reviews from users and experts alike. Its natural ingredients, smooth consistency, long-lasting stain, and ease of use make it a top choice for henna enthusiasts.
User Experience and Usability
From a practical standpoint, using Mihenna henna paste is a breeze. The cones are easy to hold and control, and the paste flows smoothly and evenly. The fine tip allows for intricate detailing, and the paste dries quickly without cracking or flaking.
Performance and Effectiveness
Mihenna henna paste delivers on its promises. The stain is rich, dark, and long-lasting, and the designs remain vibrant for up to two weeks with proper aftercare. In our experience, the color develops beautifully over 24-48 hours, resulting in a deep, reddish-brown hue.
Pros
* **Natural and Safe Ingredients:** Mihenna henna paste is made with 100% natural ingredients and is free from harmful chemicals.
* **Smooth and Creamy Consistency:** The paste has a smooth and creamy consistency that makes it easy to apply and creates crisp, clean lines.
* **Long-Lasting Stain:** Mihenna henna paste produces a rich, dark stain that can last up to two weeks with proper aftercare.
* **Easy to Use:** The cones are pre-filled and ready to use, making them a convenient option for beginners.
* **Ethically Sourced and Sustainable:** Mihenna is committed to ethical sourcing, sustainable practices, and community empowerment.
Cons/Limitations
* **Price:** Mihenna henna paste is slightly more expensive than some other brands.
* **Availability:** Mihenna products may not be available in all retail stores.
* **Essential Oil Sensitivity:** Some individuals may be sensitive to the essential oils used in Mihenna henna paste. It’s always a good idea to do a patch test before applying henna to a large area of skin.
Ideal User Profile
Mihenna henna paste is ideal for anyone who wants to create stunning henna tattoos at home. It’s particularly well-suited for beginners who are looking for a convenient and easy-to-use product. It’s also a great choice for experienced henna artists who value natural ingredients and ethical sourcing.
Key Alternatives
Two main alternatives to Mihenna are Earth Henna and Henna Caravan. Earth Henna is known for its organic henna powder, while Henna Caravan offers a wide range of henna supplies and accessories. Both brands are reputable, but Mihenna stands out for its commitment to natural ingredients and ease of use.
Expert Overall Verdict & Recommendation
Overall, Mihenna henna paste is an excellent choice for anyone who wants to create beautiful and long-lasting henna tattoos. Its natural ingredients, smooth consistency, and ease of use make it a top contender in the henna market. We highly recommend Mihenna henna paste to beginners and experienced henna artists alike.
Q&A: Your Henna Questions Answered
Here are some frequently asked questions about henna tattoos:
**Q1: How long does a henna tattoo typically last?**
A: A henna tattoo typically lasts for 1-3 weeks, depending on factors such as skin type, location of the tattoo, and aftercare.
**Q2: Can I speed up the henna staining process?**
A: Yes, you can speed up the staining process by applying heat to the henna paste using a hairdryer or a heat lamp. However, be careful not to overheat the skin.
**Q3: Is it safe to apply henna to children?**
A: It’s generally safe to apply natural henna to children, but it’s always a good idea to do a patch test first to check for allergic reactions. Avoid applying black henna to children, as it can cause severe skin damage.
**Q4: How can I make my henna tattoo last longer?**
A: To make your henna tattoo last longer, avoid washing the area with soap and water for at least 2-4 hours after removing the henna paste, apply a natural oil to moisturize the skin, and avoid exposing the tattoo to chlorine, harsh chemicals, or excessive sunlight.
**Q5: Can I swim with a henna tattoo?**
A: Swimming in chlorinated water can fade your henna tattoo faster. Apply a thick layer of petroleum jelly or waterproof sunscreen to protect the tattoo before swimming.
**Q6: What if my henna tattoo starts to fade unevenly?**
A: Uneven fading is normal. Exfoliating the skin gently and moisturizing regularly can help minimize the appearance of uneven fading.
**Q7: Can I reapply henna over an existing tattoo?**
A: Yes, you can reapply henna over an existing tattoo to refresh the color. However, make sure the skin is clean and dry before reapplying.
**Q8: What are the best essential oils to use in henna paste?**
A: Lavender, tea tree, and cajeput are popular choices for essential oils in henna paste. They enhance the staining process and add a pleasant aroma.
**Q9: How do I store leftover henna paste?**
A: Store leftover henna paste in an airtight container in the freezer. When you’re ready to use it, thaw it at room temperature and check the consistency before applying.
**Q10: Can henna be used to dye hair?**
A: Yes, henna can be used to dye hair. However, it’s important to use henna specifically formulated for hair dyeing, as body art henna may contain ingredients that are not suitable for hair.
Conclusion
Mastering how to do a henna tattoo yourself is a rewarding journey that combines artistry, cultural appreciation, and self-expression. By understanding the history, science, and techniques involved, you can create stunning henna designs that reflect your unique style and personality. Remember to always use natural henna, prioritize safety, and follow the recommended aftercare instructions for optimal results. With practice and patience, you’ll be creating beautiful henna tattoos in no time. Share your experiences with how to do a henna tattoo yourself in the comments below! Explore our advanced guide to henna design techniques for even more inspiration.
