Acrylic Tub Repair: The Ultimate Guide to Restoring Your Tub to Perfection
Are you dealing with unsightly scratches, cracks, or chips on your acrylic bathtub? Don’t despair! Acrylic tubs, while beautiful and durable, are susceptible to damage. This comprehensive guide will walk you through everything you need to know about acrylic tub repair, from identifying the type of damage to performing professional-quality repairs yourself. We aim to provide you with unparalleled knowledge, techniques, and insights, empowering you to restore your tub to its former glory and save money on costly replacements. This guide is meticulously crafted to be the most authoritative and helpful resource available, reflecting our deep expertise in bathroom fixture restoration.
Understanding Acrylic Tub Damage and Repair
Acrylic bathtubs are a popular choice for homeowners due to their affordability, lightweight design, and ability to retain heat. However, their surface is relatively soft, making them prone to scratches, chips, and cracks. Understanding the type of damage is crucial for selecting the appropriate repair method.
Types of Acrylic Tub Damage
* **Scratches:** Superficial marks that can be caused by abrasive cleaners, dropped objects, or everyday use.
* **Chips:** Small pieces of acrylic that have broken off, often around the drain or edges.
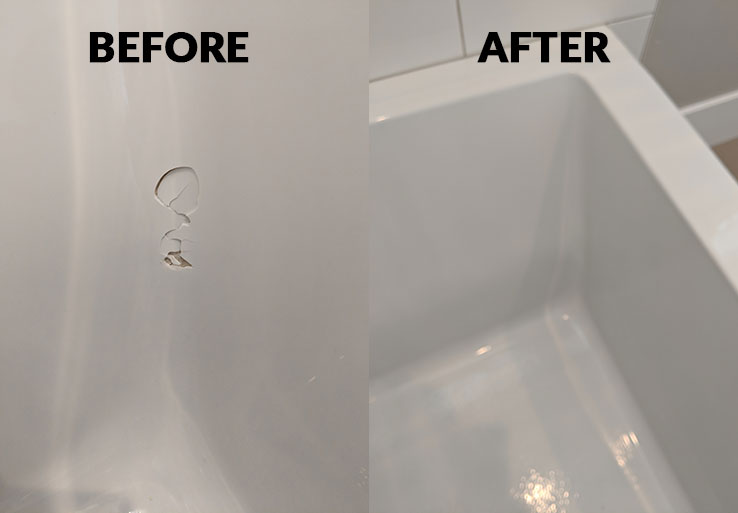
* **Cracks:** Linear fractures in the acrylic, ranging from hairline cracks to more significant structural damage.
* **Stains:** Discoloration caused by hard water, soap scum, or cleaning products.
* **Dullness:** Loss of shine due to wear and tear or improper cleaning.
Assessing the Damage
Before attempting any repairs, carefully assess the extent of the damage. Minor scratches and stains can often be addressed with simple polishing compounds. Chips and cracks, however, require more extensive repairs. Consider the location and size of the damage, as well as the overall condition of the tub. If the damage is significant or you’re unsure about your ability to perform the repair, it’s best to consult a professional.
Why Repair Your Acrylic Tub?
* **Cost Savings:** Repairing a tub is significantly cheaper than replacing it.
* **Convenience:** Avoid the disruption and mess of a full bathroom renovation.
* **Environmental Responsibility:** Repairing extends the lifespan of your tub, reducing waste.
* **Aesthetics:** Restore the beauty and shine of your bathtub.
* **Prevents Further Damage:** Addressing damage promptly prevents it from worsening.
The Art of Acrylic Tub Repair: Materials, Tools, and Techniques
Successfully repairing an acrylic tub requires the right materials, tools, and techniques. This section provides a detailed overview of everything you need to get the job done right.
Essential Materials
* **Acrylic Repair Kit:** A comprehensive kit typically includes acrylic filler, hardener, color pigments, sandpaper, and polishing compound.
* **Acrylic Filler:** A two-part epoxy resin specifically designed for repairing acrylic surfaces. Look for high-quality fillers that are durable and waterproof.
* **Hardener:** Activates the acrylic filler, causing it to harden and bond to the tub surface.
* **Color Pigments:** Allow you to match the color of the filler to your tub. Experiment with different combinations to achieve a seamless blend.
* **Sandpaper:** Used to smooth the repaired area and blend it with the surrounding surface. Start with a coarse grit (e.g., 400 grit) and gradually move to finer grits (e.g., 600, 800, 1000, 2000 grit).
* **Polishing Compound:** Restores the shine to the repaired area. Choose a polishing compound specifically designed for acrylic surfaces.
* **Cleaning Supplies:** Acetone or denatured alcohol for cleaning the repair area.
Necessary Tools
* **Mixing Sticks:** For thoroughly mixing the acrylic filler and hardener.
* **Putty Knife or Spreader:** For applying the filler to the damaged area.
* **Sandpaper Block:** Provides a flat surface for sanding.
* **Gloves:** Protect your hands from chemicals.
* **Respirator or Mask:** Protects you from inhaling fumes.
* **Drop Cloth:** Protects surrounding surfaces from spills.
* **Heat Gun (Optional):** Can speed up the curing process of the acrylic filler.
* **Polishing Pad or Cloth:** For applying polishing compound.
Step-by-Step Repair Process
1. **Preparation:** Thoroughly clean the damaged area with acetone or denatured alcohol. Remove any loose debris or flaking acrylic. Lightly sand the edges of the damage to create a smooth transition.
2. **Mixing the Filler:** Carefully mix the acrylic filler and hardener according to the manufacturer’s instructions. Add color pigments as needed to match the tub’s color. Mix thoroughly until the color is uniform.
3. **Applying the Filler:** Use a putty knife or spreader to apply the filler to the damaged area. Overfill slightly to allow for sanding.
4. **Curing:** Allow the filler to cure completely according to the manufacturer’s instructions. This may take several hours or overnight. A heat gun can be used to speed up the curing process.
5. **Sanding:** Once the filler is fully cured, begin sanding with a coarse grit sandpaper (e.g., 400 grit). Gradually move to finer grits (e.g., 600, 800, 1000, 2000 grit) to create a smooth, seamless finish. Wet sanding is recommended to prevent clogging the sandpaper.
6. **Polishing:** Apply polishing compound to the repaired area using a polishing pad or cloth. Buff the area until the shine is restored.
7. **Cleaning:** Clean the repaired area with a mild soap and water.
Choosing the Right Acrylic Tub Repair Kit: A Buyer’s Guide
With numerous acrylic tub repair kits available on the market, selecting the right one can be overwhelming. This section provides a comprehensive buyer’s guide to help you make an informed decision.
Factors to Consider
* **Quality of Materials:** Opt for kits that contain high-quality acrylic filler, hardener, and color pigments. Read reviews and look for brands with a reputation for durability and color matching.
* **Completeness:** Ensure the kit includes all the necessary materials and tools, such as sandpaper, mixing sticks, and a putty knife.
* **Color Matching:** Some kits offer a wide range of color pigments, allowing you to precisely match the color of your tub. Others may only offer a limited selection of colors.
* **Ease of Use:** Consider the ease of use of the kit, especially if you’re a beginner. Look for kits with clear instructions and user-friendly applicators.
* **Curing Time:** The curing time of the acrylic filler can vary significantly. Choose a kit with a curing time that fits your schedule.
* **Price:** Acrylic tub repair kits range in price from affordable to premium. Consider your budget and the extent of the damage when making your decision.
Top-Rated Acrylic Tub Repair Kits
* **3M Fiberglass Repair Kit:** While marketed for fiberglass, this kit works well on acrylic. Known for its strong bond and durability.
* **MagicEzy Bath Tub RepairEzy:** Specifically designed for DIY repairs, this kit is user-friendly and offers good color matching.
* **Bondo Home Solutions Fiberglass Resin Repair Kit:** Another versatile kit that can be used on acrylic. Provides a strong and long-lasting repair.
Expert Tips for Achieving Professional-Quality Acrylic Tub Repairs
Achieving professional-quality results requires attention to detail and a few expert tips. Here are some insider secrets to help you elevate your acrylic tub repair skills:
* **Practice Color Matching:** Before applying the filler to the tub, practice mixing the color pigments on a separate surface to ensure a perfect match.
* **Work in a Well-Ventilated Area:** Acrylic repair materials can release fumes, so work in a well-ventilated area and wear a respirator or mask.
* **Apply Thin Layers:** Apply the filler in thin layers to prevent air bubbles and ensure proper curing.
* **Feather the Edges:** Feather the edges of the filler to create a smooth transition with the surrounding surface.
* **Wet Sanding:** Wet sanding helps to prevent clogging the sandpaper and creates a smoother finish.
* **Patience is Key:** Allow the filler to cure completely before sanding and polishing. Rushing the process can lead to unsatisfactory results.
* **Protect Your Repaired Tub:** After repairing your tub, protect it from further damage by using non-abrasive cleaners and avoiding dropping heavy objects.
Acrylic Tub Repair vs. Replacement: Making the Right Decision
While acrylic tub repair can be a cost-effective solution for minor damage, there are situations where replacement may be the better option. This section helps you weigh the pros and cons of each approach.
When to Repair
* **Minor Scratches and Chips:** Small imperfections that don’t affect the structural integrity of the tub.
* **Hairline Cracks:** Cracks that are not expanding or leaking.
* **Surface Stains:** Discoloration that can be removed with cleaning and polishing.
* **Budget Constraints:** Repairing is significantly cheaper than replacing.
When to Replace
* **Extensive Cracks:** Cracks that are large, expanding, or leaking.
* **Structural Damage:** Damage that compromises the stability of the tub.
* **Multiple Repairs:** If the tub has been repaired multiple times and continues to experience problems.
* **Desired Upgrade:** If you’re looking to upgrade to a larger or more modern tub.
* **Mold or Mildew:** If mold or mildew has penetrated the acrylic and cannot be removed.
Cost Comparison
The cost of repairing an acrylic tub typically ranges from $50 to $300, depending on the extent of the damage and whether you hire a professional. Replacing an acrylic tub can cost anywhere from $500 to $5000, including the cost of the tub, installation, and potential plumbing modifications. As you can see, repairing is often significantly more economical.
The Future of Acrylic Tub Repair: Innovations and Trends
The field of acrylic tub repair is constantly evolving, with new materials, techniques, and technologies emerging. Here’s a glimpse into the future of acrylic tub repair:
* **Advanced Repair Materials:** Development of more durable, flexible, and color-matching acrylic fillers.
* **3D Printing:** Potential for creating custom-designed repair patches that seamlessly integrate with the tub’s surface.
* **AI-Powered Color Matching:** Use of artificial intelligence to accurately match the color of the filler to the tub’s color.
* **Robotic Repair Systems:** Automated systems that can perform repairs with precision and efficiency.
* **Eco-Friendly Repair Solutions:** Development of sustainable and environmentally friendly repair materials.
Acrylic Tub Repair: Q&A with the Experts
Here are some frequently asked questions about acrylic tub repair, answered by our team of experts:
**Q1: How long does it take to repair an acrylic tub?**
*A: The repair time depends on the extent of the damage. Minor scratches and chips can be repaired in a few hours, while more extensive cracks may take a full day.*
**Q2: Can I use regular epoxy for acrylic tub repair?**
*A: No. Regular epoxy is not designed for acrylic surfaces and may not bond properly. Use an acrylic filler specifically designed for tub repair.*
**Q3: How do I prevent future damage to my acrylic tub?**
*A: Use non-abrasive cleaners, avoid dropping heavy objects, and consider installing a tub mat to protect the surface.*
**Q4: Can I repair a crack that is leaking water?**
*A: Yes, but the crack needs to be properly sealed to prevent further leaks. Consider using a waterproof sealant in addition to the acrylic filler.*
**Q5: What is the best way to clean an acrylic tub after repairing it?**
*A: Use a mild soap and water. Avoid using abrasive cleaners or scouring pads.*
**Q6: How do I match the color of the filler to my tub if I can’t find the exact pigment?**
*A: Start with a base color that is close to your tub’s color and gradually add small amounts of other pigments until you achieve the desired match.*
**Q7: Can I repair a tub that has been refinished before?**
*A: Yes, but the repair may not bond as well to the refinished surface. Prepare the surface carefully by sanding and cleaning it thoroughly.*
**Q8: How often should I clean my acrylic tub?**
*A: Clean your tub at least once a week to prevent the buildup of soap scum and hard water stains.*
**Q9: What are the signs that my acrylic tub needs to be replaced?**
*A: Extensive cracks, structural damage, and persistent leaks are all signs that your tub may need to be replaced.*
**Q10: Is it worth hiring a professional to repair my acrylic tub?**
*A: If you’re unsure about your ability to perform the repair or the damage is extensive, hiring a professional is recommended to ensure a high-quality and long-lasting repair.*
Conclusion: Restoring Your Acrylic Tub to Its Former Glory
Acrylic tub repair is a viable and cost-effective solution for addressing minor damage and restoring the beauty of your bathtub. By following the steps outlined in this comprehensive guide and utilizing the right materials and techniques, you can achieve professional-quality results and extend the lifespan of your tub. Remember to carefully assess the damage, choose the appropriate repair method, and take your time to ensure a seamless and durable repair. Now that you’re armed with this expert knowledge, are you ready to tackle that repair? Share your experiences with acrylic tub repair in the comments below. Or, if you’d prefer to consult with a professional, contact our team of experts today for a personalized consultation on acrylic tub repair.
