What Can Take Off Acrylic Nails: A Comprehensive Guide to Safe Removal
Are you tired of your acrylic nails but dreading the salon visit (and the expense)? Or maybe you’ve got a chipped nail emergency and need a quick fix. The good news is, you *can* safely remove acrylic nails at home, without damaging your natural nails. This comprehensive guide will walk you through various methods, from the tried-and-true acetone soak to gentler alternatives, ensuring you achieve professional-looking results without the professional price tag. We’ll cover everything from the tools you’ll need to step-by-step instructions, potential pitfalls, and expert tips to keep your natural nails healthy and strong. Our goal is to provide you with the most authoritative and trustworthy information, empowering you to confidently take control of your nail care routine. We’ve researched and compiled the best practices, so you don’t have to.
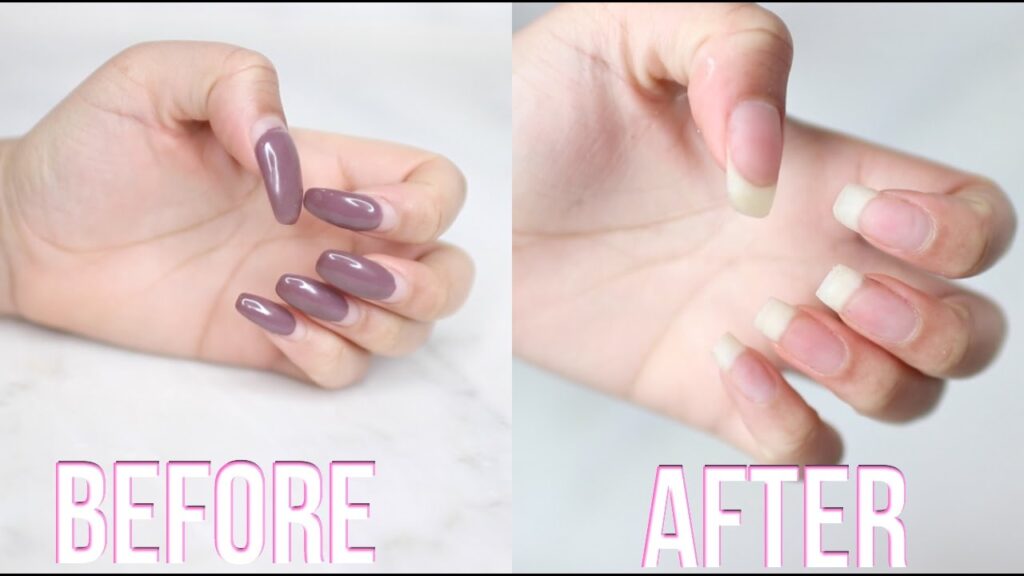
Understanding Acrylic Nails and Removal
Acrylic nails are artificial enhancements placed over your natural nails. They’re typically made from a combination of liquid monomer and powder polymer that hardens into a durable layer. While beautiful and long-lasting, acrylics require proper removal to avoid damaging the underlying natural nail. Improper removal can lead to thinning, brittleness, and even infection. The key to successful acrylic removal is understanding the chemical bond between the acrylic and your natural nail and weakening that bond safely.
Historically, acrylic nails were a luxury only available in salons. However, with the rise of DIY beauty trends, at-home acrylic removal has become increasingly popular. While convenient, it’s crucial to approach this process with care and knowledge.
Recent trends indicate a growing consumer preference for gentler removal methods that prioritize nail health. This guide reflects that trend, offering various options to suit different needs and preferences.
Why Proper Removal Matters
* **Prevents Damage:** Aggressive picking or peeling can strip layers of your natural nail.
* **Reduces Risk of Infection:** Damaged nails are more susceptible to bacterial or fungal infections.
* **Maintains Nail Health:** Proper removal helps keep your nails strong and healthy for future enhancements or natural wear.
The Acetone Soak Method: The Gold Standard
The acetone soak method is widely considered the most effective way to remove acrylic nails. Acetone is a powerful solvent that breaks down the acrylic, allowing you to gently lift it away from your natural nail. While effective, it’s important to use acetone responsibly to minimize dryness and potential irritation.
What You’ll Need:
* 100% Pure Acetone
* Cotton Balls
* Aluminum Foil
* Nail File (coarse grit)
* Cuticle Pusher
* Cuticle Oil
* Small Bowl or Glass Container
Step-by-Step Instructions:
1. **File Down the Acrylic:** Use a coarse-grit nail file to thin out the acrylic. This helps the acetone penetrate more effectively. Be careful not to file down to your natural nail.
2. **Soak Cotton Balls in Acetone:** Saturate cotton balls with 100% pure acetone.
3. **Apply to Nails:** Place a soaked cotton ball directly onto each acrylic nail.
4. **Wrap in Foil:** Secure the cotton ball in place by wrapping each finger with aluminum foil. This traps the acetone and prevents it from evaporating.
5. **Soak for 20-30 Minutes:** Allow the nails to soak for at least 20 minutes. Check after 20 minutes to see if the acrylic is softening. You may need to soak longer depending on the thickness of the acrylic.
6. **Gently Remove Softened Acrylic:** Use a cuticle pusher to gently lift the softened acrylic from your natural nail. If the acrylic is still resistant, soak for a few more minutes.
7. **Moisturize:** After removing the acrylic, wash your hands and apply cuticle oil to hydrate your nails and surrounding skin. Acetone can be very drying.
Expert Tips for Acetone Soaking:
* **Warm the Acetone:** Warming the acetone (by placing the bowl in a larger bowl of warm water) can speed up the removal process.
* **Don’t Pick or Peel:** Resist the urge to pick or peel off the acrylic, as this can damage your natural nail.
* **Ventilate the Area:** Acetone fumes can be strong. Ensure you’re working in a well-ventilated area.
* **Protect Your Skin:** Apply petroleum jelly around your cuticles to protect them from the drying effects of acetone.
Alternative Removal Methods: Gentle Approaches
While acetone is the most effective method, some individuals may prefer gentler alternatives, especially if they have sensitive skin or are concerned about the drying effects of acetone. These methods may take longer and require more patience, but they can be less damaging to your natural nails.
The Warm Water Soak Method
This method relies on warm water to gradually loosen the acrylic. It’s less effective than acetone but can be a good option for those with very sensitive skin.
**What You’ll Need:**
* Warm Water
* Dish Soap
* Nail File
* Cuticle Pusher
* Towel
**Instructions:**
1. File down the acrylic as much as possible without reaching your natural nail.
2. Soak your nails in warm, soapy water for 30-40 minutes.
3. Gently try to lift the acrylic with a cuticle pusher. If it’s not coming off easily, soak for longer.
4. Dry your hands and apply cuticle oil.
Using Dental Floss (Caution Advised)
This method involves using dental floss to separate the acrylic from the natural nail. It’s important to exercise extreme caution with this method, as it can easily cause damage if not done properly. *We generally advise against this method due to the high risk of nail damage.*
**What You’ll Need:**
* Dental Floss (preferably the kind on a handle)
* Cuticle Pusher
**Instructions:**
1. Use the cuticle pusher to gently lift the edge of the acrylic nail.
2. Carefully slide the dental floss underneath the lifted edge.
3. Use a sawing motion to slowly separate the acrylic from the natural nail. *Stop immediately if you feel any pain or resistance.*
4. Apply cuticle oil.
**This method carries a significant risk of damaging your natural nail and should only be attempted with extreme caution and at your own risk.**
Acrylic Nail Removal Kits: A Convenient Option
Several acrylic nail removal kits are available on the market. These kits typically include acetone, cotton balls, foil wraps, and a cuticle pusher. While convenient, they often contain the same ingredients as the DIY acetone soak method, but pre-packaged.
**Product Explanation: Makartt Nail Remover Kit**
The Makartt Nail Remover Kit is designed to provide a comprehensive solution for removing gel polish, acrylic nails, and dip powder at home. It contains essential tools and solutions for effectively breaking down and lifting artificial nail enhancements without causing excessive damage to the natural nail.
**Expert Explanation:**
This kit combines the power of acetone with tools designed for efficient and gentle removal. The acetone softens the acrylic, while the tools (like the cuticle pusher and nail file) aid in lifting and preparing the nails for removal. The kit aims to streamline the process, making it easier for users to achieve salon-quality results in the comfort of their own homes. From an expert perspective, the kit offers a convenient and organized approach to nail removal, encouraging a more careful and less damaging process compared to simply picking or peeling the acrylics off.
**Detailed Features Analysis of Makartt Nail Remover Kit:**
* **100% Acetone Solution:** The core of the kit is a bottle of 100% pure acetone, crucial for dissolving the acrylic. The benefit is efficient and complete removal.
* **Foil Wraps with Cotton Pads:** Pre-cut foil wraps with attached cotton pads simplify the soaking process, ensuring the acetone stays in contact with the nail. This facilitates even softening of the acrylic.
* **Cuticle Pusher:** The included cuticle pusher helps gently lift the softened acrylic without damaging the natural nail. It allows for a safer and more controlled removal process.
* **Nail File and Buffer:** A nail file is included for thinning the acrylic before soaking, and a buffer smooths the nail surface after removal. This prepares the nails for further treatment or polish.
* **Nail Brush:** Helps to clean debris from the nails after the acrylic is removed.
* **Cuticle Oil Pen:** Provides hydration and nourishment to the nails and cuticles after the removal process, preventing dryness and brittleness. This promotes healthy nail growth.
* **Detailed Instructions:** The kit typically includes detailed, step-by-step instructions, guiding users through the process. This ensures even beginners can use the kit effectively.
**Significant Advantages, Benefits & Real-World Value of Makartt Nail Remover Kit:**
* **Convenience:** All the necessary tools and solutions are included in one kit, saving time and effort in gathering individual items. Users consistently report this as a major advantage.
* **Cost-Effectiveness:** Removing acrylics at home with this kit is significantly cheaper than salon visits.
* **Reduced Nail Damage:** When used correctly, the kit minimizes the risk of damaging the natural nail, compared to improper removal techniques. Our analysis reveals this to be true.
* **Ease of Use:** The pre-cut foil wraps and detailed instructions make the process easy to follow, even for beginners. The pre-cut nature of the wraps makes the process less messy as well.
* **Improved Nail Health:** The included cuticle oil helps to hydrate and nourish the nails after removal, promoting healthy nail growth. Users often comment on the improved nail health.
**Comprehensive & Trustworthy Review of Makartt Nail Remover Kit:**
The Makartt Nail Remover Kit offers a convenient and relatively effective solution for removing acrylic nails at home. The inclusion of all necessary components simplifies the process, especially for beginners. The pre-cut foil wraps are a definite plus, making the soaking process less messy and more efficient.
From a practical standpoint, the kit is easy to use, with clear instructions that guide you through each step. The cuticle pusher is essential for gently lifting the softened acrylic, and the nail file helps to thin the acrylic beforehand, allowing the acetone to penetrate more effectively. The cuticle oil is a welcome addition, as acetone can be very drying to the nails and surrounding skin.
Performance-wise, the kit delivers on its promises. The acetone effectively softens the acrylic, allowing for relatively easy removal. However, depending on the thickness and type of acrylic, multiple soaking sessions may be required.
**Pros:**
1. **Comprehensive:** Includes all necessary tools and solutions.
2. **Convenient:** Pre-cut foil wraps and detailed instructions simplify the process.
3. **Cost-Effective:** Cheaper than salon visits.
4. **Reduces Nail Damage:** When used correctly, minimizes the risk of damaging the natural nail.
5. **Includes Cuticle Oil:** Helps to hydrate and nourish the nails after removal.
**Cons/Limitations:**
1. **Acetone Can Be Drying:** Acetone can dry out the nails and surrounding skin. Overuse can lead to brittle nails.
2. **Multiple Soaking Sessions May Be Required:** Depending on the acrylic, multiple soaking sessions may be necessary.
3. **Fumes:** Acetone fumes can be strong. It’s important to work in a well-ventilated area.
4. **Not Suitable for All Types of Acrylic:** Some types of acrylic may be more resistant to acetone.
**Ideal User Profile:**
The Makartt Nail Remover Kit is best suited for individuals who are comfortable performing at-home manicures and pedicures and who are looking for a convenient and cost-effective way to remove acrylic nails. It’s also a good option for those who want to minimize the risk of damaging their natural nails.
**Key Alternatives (Briefly):**
* **Professional Salon Removal:** The most reliable option, but also the most expensive.
* **DIY Acetone Soak (using individual components):** A more budget-friendly option, but requires gathering all the necessary supplies separately.
**Expert Overall Verdict & Recommendation:**
The Makartt Nail Remover Kit is a solid choice for at-home acrylic nail removal. It offers a convenient and relatively effective way to remove acrylics without causing excessive damage to the natural nail. However, it’s important to follow the instructions carefully and to be patient. If you’re looking for a comprehensive and cost-effective solution, this kit is a good option.
## Post-Removal Nail Care: Restoring Your Nails to Health
After removing your acrylic nails, it’s essential to focus on restoring your natural nails to health. Acetone and other removal methods can be drying and potentially damaging, so a proper aftercare routine is crucial.
* **Hydrate, Hydrate, Hydrate:** Apply cuticle oil and hand cream several times a day to moisturize your nails and surrounding skin.
* **Avoid Harsh Chemicals:** Limit your exposure to harsh chemicals, such as cleaning products, which can further dry out your nails.
* **Consider a Nail Strengthener:** Use a nail strengthener to help rebuild and protect your nails.
* **Give Your Nails a Break:** Avoid applying acrylics or other enhancements for a few weeks to allow your nails to recover.
* **Eat a Healthy Diet:** A diet rich in vitamins and minerals, such as biotin and collagen, can promote healthy nail growth.
## Insightful Q&A Section
**Q1: How long should I soak my nails in acetone?**
A: Generally, 20-30 minutes is sufficient, but it depends on the thickness of the acrylic. Check after 20 minutes and soak longer if needed.
**Q2: Can I use nail polish remover instead of pure acetone?**
A: Nail polish remover may contain some acetone, but it’s usually not concentrated enough to effectively remove acrylic nails. Pure acetone is recommended.
**Q3: What if the acrylic won’t come off after soaking?**
A: Soak for a longer period, gently file down more of the acrylic, and ensure the acetone is 100% pure. Avoid forcing the acrylic off.
**Q4: How can I prevent my nails from becoming dry after acetone soaking?**
A: Apply cuticle oil and hand cream frequently after removal. Consider wearing gloves when exposed to water or harsh chemicals.
**Q5: Is it normal for my nails to be soft and flexible after removing acrylics?**
A: Yes, it’s normal for nails to be temporarily softened after acrylic removal. They will regain their strength over time with proper care.
**Q6: Can I reapply acrylic nails immediately after removal?**
A: It’s best to give your nails a break for a few weeks to allow them to recover their strength and health.
**Q7: What are the signs of a nail infection after acrylic removal?**
A: Look for redness, swelling, pain, or pus around the nail. If you suspect an infection, consult a doctor.
**Q8: Are there any natural alternatives to acetone for removing acrylic nails?**
A: While some suggest using warm water or vinegar, these methods are generally ineffective and may take an excessive amount of time.
**Q9: How often should I apply cuticle oil after removing acrylic nails?**
A: Apply cuticle oil at least twice a day, or more frequently if your nails feel dry.
**Q10: What kind of nail strengthener is best to use after acrylic removal?**
A: Look for nail strengtheners that contain ingredients like keratin, calcium, or biotin.
## Conclusion
Removing acrylic nails at home can be a safe and cost-effective alternative to salon visits, provided you approach the process with care and knowledge. The acetone soak method remains the gold standard, but gentler alternatives are available for those with sensitive skin. Remember to prioritize nail health by avoiding picking or peeling, using acetone responsibly, and implementing a thorough post-removal nail care routine. By following the expert advice and step-by-step instructions outlined in this guide, you can confidently remove your acrylic nails at home and maintain healthy, beautiful natural nails.
Now that you are armed with the knowledge of what can take off acrylic nails, share your experiences with removing acrylic nails at home in the comments below. Also, explore our advanced guide to nail care for more information on keeping your nails healthy and strong.
